Monday, September 10, 2012

DIY Cap Toe Flats

Hello everyone! 
Boy, life just never stops being busy huh? And busy-ness inevitably leads to less blogging. One of the things that's kept me quite occupied is redesigning the blog for BMW Photography. Brinn Willis of BMW Photography took our engagement photos almost a year ago, and it was fun working with her again--this time to give her blog a facelift! It certainly was challenging, but I definitely learned a lot, and having this experience will really help me in my journey to become a bona-fide graphic designer. So head on over to her blog and check out my new work and her gorgeous photos!

Two weeks ago I did manage to finish a little DIY project to share however!


I'm sure you've seen some of these fun cap toe flats around lately, and now that fall is coming, its time to start strutting your stuff in some new shoes!


1 | 2 | 3 | 4 | 5 |

Back track to last month, and I picked up some nude canvas flats from Urban Outfitters for the upcoming fall season (something like this). Though I liked them, I thought they just needed a little more oomph. Since they were canvas, I realized they were perfect for painting!

So here's what ya do:


Grab a pair of plain flats (and ignore the creepy man's face on the newspaper). Especially if they aren't canvas, you'll want to go over them with a coat or two of primer. Measure to the middle point of the shoe and mark where you'd like the cap to end. Mark the same point on the other shoe. Now, you can either tape straight across the shoe, but I wanted a more rounded cap, so I free handed it on one shoe, measured that cap, then drew it again on the other.


Use painters tape to mark off the cap--make sure to press really well so that when you apply the paint, it won't seep through. Because I'm a major perfectionist, I taped off the sole of the shoe as well. Next, grab your choice of acrylic paint (I've also heard of doing it with spray paint or nail polish) and fill in the cap with an even coat.


Let the paint dry, then remove the tape carefully. You might have a couple spots where the paint seeped through like I did (no matter how hard I tried!), so you can use a small paint brush to touch up the edges.


I decided to add a thin stripe in another color. Again, just use a small paint brush to paint a thin line, touching up the edges of the cap. You could also use tape to create another line (after the first coat has dried, of course). Let them dry completely. Since mine were canvas, after they dried I also used some scotch guard to protect them from getting too dirty--and hopefully to keep them as long as I can!


Ta-Da!

There you are--A quick and easy DIY, and a lovely pair of cap toe flats!
Happy crafting!

Thursday, January 19, 2012

For the Peanuts: Cut Paper Letters


I just started a class called Art for the Young Child. I thought since I'm an Art and Family & Child Development double major and I work at a Montessori school, this would be right up my alley. I have to say, after only a couple classes, I already love it. We basically get to do arts and crafts each week but we also learn how a project corresponds with developmental levels and the education standards set by the state of Virginia. Its so neat to see the other things people choose to make (its a very open list of projects), and I always leave the class feeling upbeat and ready to tackle other tasks and projects I have.

After doing this project, I was just too proud of it and had so much fun, and I wanted a way to share it on the blog. So here's what I'm thinking: each time I do a project for the class, I'll share it the blog and at the end of the semester, we'll have a little collection of projects perfect for little peanuts. Hopefully this will be helpful to the handful of mamas and papas out there who I know follow the blog. 

All you need for this project is a pair of scissors and paper--hows that for an easy, inexpensive first project?? Before I cut my letters, I painted two sheets of 12x18 paper with acrylic paint I had in the house to give my letters a little oomph. After the paper dried, I roughly cut 30 squares and rectangles (15 from each sheet) from which to cut my letters. For the class we just needed to cut the alphabet and a title and glue to 12x18 paper, but you can obviously use these letters for anything--its a fun activity for kids and can help little ones practice with their scissor skills, and adults can tidy them up (mine are looking a tad rough) and cut out nicer letters for bulletin boards, room decorations, etc.


The project came from my textbook, A Handbook of Arts and Crafts, and since I currently should be doing the homework for my Humanities, Research Methods, AND American Literature classes, I'm not going to post the directions for every single letter. BUT, if you check out this website, you'll find a similar method for all 26 letters of the alphabet with step by step photos. 

Happy Crafting!

Monday, December 19, 2011

Fabric Hairpiece Tutorial

I got a lot of comments about the green hairpiece I made for our engagement photos last month, and while making a few fabric headbands for a friend, I was inspired to make a tutorial. This is an easy, no sew project--perfect for whipping up before Christmas this week!


The only difference with this tutorial is that the fabric used is cotton, whereas the green fabric was satin. I used a lighter on the edges of the green one to add a little more curl--but be careful! This only works for synthetic fabrics. If you try it on the cotton, it will burn to a crisp in no time!


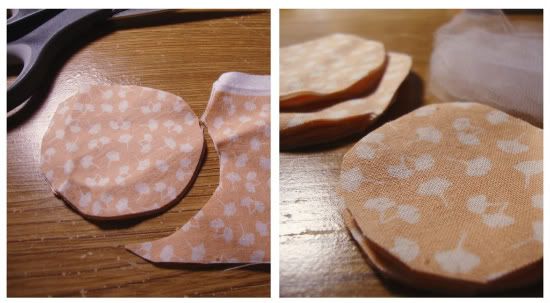
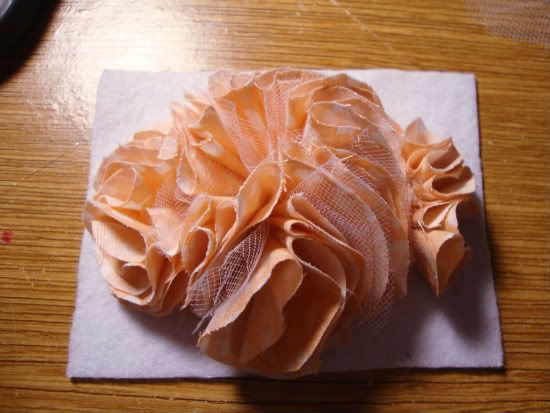
Cut a couple dozen circles from the fabric. Since I wanted a large hairpiece, the green circles were probably three inches in diameter. However, since this peachy headband was for a little one, the circles were about two inches. I also cut some smaller circles and a few white tulle circles to add a little variation. Also, the number of circles needed depends on how full you want your piece. Finally, don't worry about them being perfectly circular.


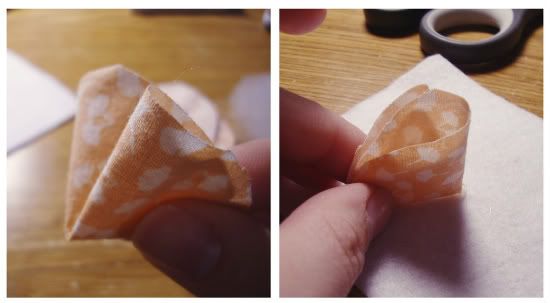
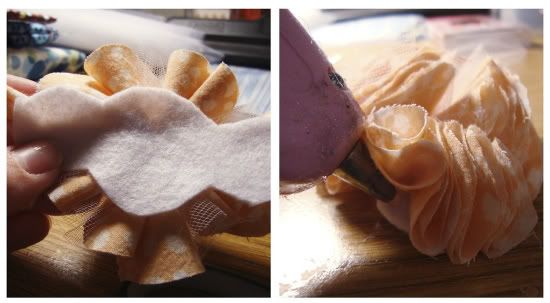
One at a time, fold a circle in quarters. I fold some right-side in and some-right side out; it just depends on the look you want. With your hot glue gun, place a bead of glue on the tip of the fold, and attach to a piece of felt. 


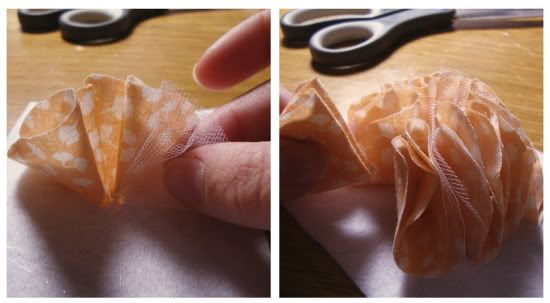
Continue to fold and glue the fabric around in a circle. I added a piece of tulle after every third peach circle.


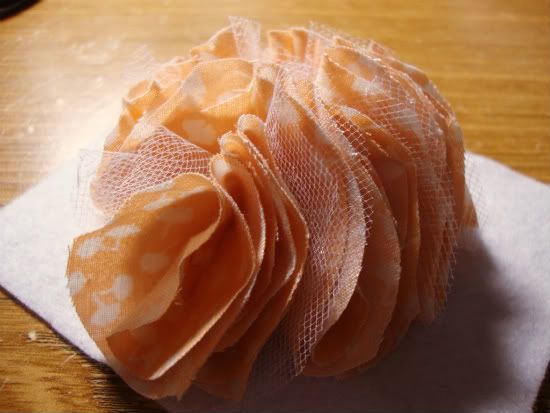
Fill with folded circles until it reaches a fullness and appearance that you like.


Remember the smaller circles? You can fold and glue them on opposite ends to change the overall shape of the fabric cluster.


Next, turn the felt over and trim to make a base small enough that it won't be seen from the top side of the fabric. You can go back in with the glue gun to attach the edges of the felt to the fabric to make it a little more secure and firm.


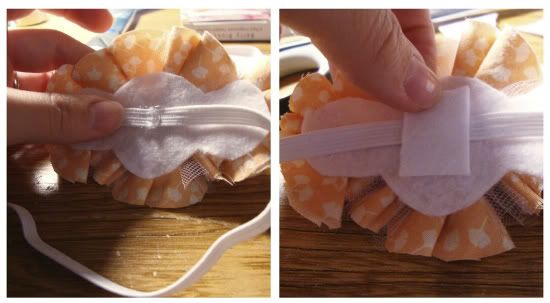
Take a piece of elastic cut to fit around the head snuggly, and glue each end to the center of the felt. Make sure to double check which way you want the piece to sit on the head and glue the elastic accordingly. You can also use hard headbands, pre-made stretch headbands, or clips--again, since this was for a little girl, I used a piece of elastic instead to make sure it was small enough to stay on her little head. Next, cover the "seam" by gluing a small square of felt to the back.


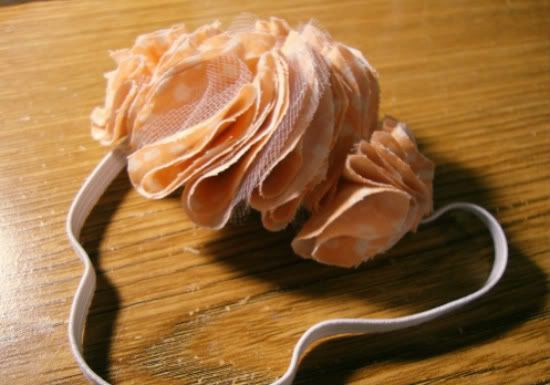
And there you are--a fun hairpiece for a little one, a dear friend, or yourself!

Related Posts Plugin for WordPress, Blogger...